
Understanding How To Clean Hearing Aids for Best Performance
Updated March, 2026
Your hearing aids work hard every single day. They sit in one of the warmest, most humid environments imaginable, right inside your ear canal, while earwax, moisture, and skin oils accumulate around them constantly. Consistent hearing aid maintenance is one of the most impactful things you can do to protect your investment and keep your sound quality sharp.
The good news is that proper hearing aid maintenance takes just a few minutes each day. This guide walks you through everything: daily habits, style-specific cleaning steps, what to avoid, and when to bring your devices in for professional care.
Why Hearing Aid Maintenance Matters
Most hearing aid performance problems trace back to one source: inadequate care. Earwax is the number one cause of hearing aid repairs. It blocks sound ports, clogs microphone screens, and coats receivers until sound quality degrades or the device stops working entirely.
Moisture compounds the problem. Sweat, humidity, and condensation work their way into seams and electronic components. Over time, corrosion sets in, shortening device life and triggering malfunctions.
Regular hearing aid maintenance prevents all of this. Devices that get daily attention last longer, perform better, and need fewer repairs. The American Speech-Language-Hearing Association recommends consistent care as a core part of successful hearing aid use.
Good maintenance also protects your ear health. Wax and debris left on a device sitting in your ear canal can contribute to irritation or infection. Keeping your devices clean protects both your ears and your equipment.
What You Need Before You Start
Proper hearing aid maintenance requires the right tools. Using the wrong materials can damage delicate components. Your hearing care provider should supply a basic kit at your fitting appointment. Here is what to have on hand:
- Soft, dry cloth or microfiber wipe for daily surface cleaning
- Cleaning brush with soft bristles for removing wax from ports and vents
- Wax pick or loop tool for dislodging stubborn debris from openings
- Wax guards or filters for replacement on a regular schedule
- Vent cleaner (thin filament tool) for clearing vent channels
- Drying container or electronic dehumidifier for overnight moisture removal
- Bulb blower for clearing moisture from tubing on BTE styles
Avoid cotton swabs, rubbing alcohol, cleaning solutions, and water near electronics. These damage internal components and void most warranties. For a quick reference on what to use and what to skip, our hearing aid cleaning dos and don’ts guide covers the full list.
The Golden Rules of Hearing Aid Maintenance
Before getting into style-specific steps, these principles apply to every device, every time:
- Always clean over a soft surface. A dropped hearing aid on a hard floor can crack a shell or damage a receiver.
- Always clean in the evening, not the morning. This gives any moisture time to fully dry overnight before you put them back in.
- Always hold the device with the opening facing downward while cleaning. Gravity pulls loosened debris out rather than pushing it deeper.
- Never use heat to dry your hearing aids. Hair dryers, microwaves, and direct sunlight all damage electronics.
- Wash your hands before handling your hearing aids every time.
Hearing Aid Maintenance by Style
Different hearing aid styles require slightly different approaches. Follow the steps that match your device type.
Receiver-in-Canal (RIC) and Receiver-in-the-Ear (RITE) Hearing Aids
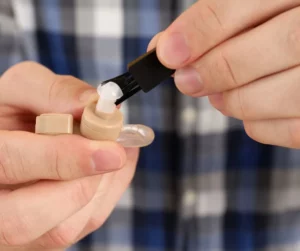
RIC and RITE styles sit behind the ear with a thin wire running into the ear canal. The receiver (speaker) at the end of the wire sits closest to the eardrum and collects the most wax.
- Wipe the body of the hearing aid with a soft, dry cloth.
- Brush the microphone ports on the top of the device gently with your cleaning brush.
- Inspect the receiver tip (dome or custom mold) for wax buildup.
- If you use a dome tip, remove it and check or replace the wax guard. Replace wax guards monthly or when sound seems muffled.
- If you use a custom earmold, detach it and wipe it clean. Soak it briefly in warm water if needed, then dry thoroughly before reattaching. Never soak the hearing aid body itself.
- Use the wax pick to clear any visible debris from the dome opening.
- Store in a drying container or dehumidifier overnight.
Behind-the-Ear (BTE) Hearing Aids
BTE styles rest behind the ear with a tube connecting to an earmold that sits in the ear canal. The earmold and tubing require special attention.
- Wipe the device body with a soft, dry cloth.
- Brush the microphone ports on top of the device.
- Disconnect the earmold from the hook at the top of the device.
- Wash the earmold in warm, soapy water. Rinse thoroughly.
- Use a bulb blower to push water out of the tubing before it dries.
- Allow the earmold to dry completely before reconnecting. Moisture trapped in tubing is a common cause of muffled sound and feedback.
- Check the tubing for cracks, hardening, or discoloration. Replace tubing every three to six months or sooner if it shows wear.
- Store the device in a drying container overnight.
In-the-Ear (ITE), In-the-Canal (ITC), and Completely-in-Canal (CIC) Hearing Aids
Custom in-the-ear styles fit fully inside the ear. Because they sit deeper and closer to wax-producing skin, they require extra attention to wax management.
- Hold the device facing downward with the sound port pointing toward the floor.
- Brush all openings, including the microphone port, sound port, and any vents, with your cleaning brush.
- Use the wax pick to clear visible wax from the sound port opening. Work gently and do not push debris inward.
- Check and replace the wax guard. ITE styles typically need wax guard changes every two to four weeks depending on how much wax you produce.
- Use the vent cleaner to thread through any vent channels. Wipe it clean before withdrawing.
- Wipe the entire shell with a soft, dry cloth.
- Store in a drying container overnight.
Rechargeable Hearing Aids
Rechargeable models follow the same style-specific steps above, with a few additional considerations for the charging system.
- Follow the maintenance steps for your specific style (RIC, ITE, or BTE) as described above.
- Before placing devices in the charger, wipe the charging contacts on both the hearing aids and inside the charging case with a dry cloth or soft brush.
- Check charging contacts for wax or debris regularly. Dirty contacts cause charging failures.
- Never use water or cleaning solutions near charging ports.
- Store hearing aids in the charging case when not in use. This keeps them protected and easy to find.
For more detail on rechargeable-specific care and what to expect from battery longevity, see our guide to rechargeable hearing aids.
Hearing Aid Maintenance by Style: Quick Reference
| Style | Daily Wipe | Wax Guard Frequency | Earmold Soak | Tubing Check | Dehumidifier |
|---|---|---|---|---|---|
| RIC / RITE | Yes | Monthly or when muffled | Dome only, not body | Not applicable | Nightly |
| BTE | Yes | Not typical | Yes, nightly if tolerated | Every 3 to 6 months | Nightly |
| ITE / ITC / CIC | Yes | Every 2 to 4 weeks | No | Not applicable | Nightly |
| Rechargeable (any style) | Yes | Per style above | Per style above | Per style above | Charging case |
What to Avoid: Common Hearing Aid Maintenance Mistakes
Knowing what not to do protects your devices just as much as knowing the right steps. These are the most common mistakes that lead to damage and costly repairs:
- Water on the device body. Even water-resistant hearing aids should not be rinsed. IP ratings protect against incidental moisture, not submersion or running water during cleaning.
- Alcohol wipes or cleaning sprays. These strip protective coatings and degrade seals over time.
- Cotton swabs. The fibers break off and lodge inside ports and microphone screens.
- Blowing into ports with your mouth. Human breath carries moisture and bacteria directly into delicate components.
- Cleaning in the morning. Devices cleaned at night have time to dry fully before going back in your ears.
- Skipping the dehumidifier. One night of poor moisture removal can accelerate corrosion that builds over months.
Building a Hearing Aid Maintenance Routine
Consistency beats perfection. A simple routine you do every night takes less than three minutes and prevents the majority of wax and moisture problems. Here is a practical starting framework:
Every evening:
- Remove your hearing aids and set them on a clean, soft surface
- Wipe down both devices with a dry cloth
- Brush microphone ports and any openings
- Use the wax pick to clear the sound port if you see visible buildup
- Place them in the dehumidifier or charging case for the night
Weekly:
- Inspect wax guards and replace if sound seems muffled or wax is visible
- Check earmold tubing on BTE styles for cracks or hardening
- Wipe inside the charging case or drying container
- Check your supply of wax guards and restock if running low
Monthly:
- Replace wax guards regardless of visible buildup
- Deep clean earmolds with warm water if you wear BTE or some RIC styles
- Review how devices have been performing and note any changes in sound quality

When to Bring Your Hearing Aids In for Professional Maintenance
At-home care handles daily upkeep well. Some issues need tools and expertise that go beyond what a cleaning brush can reach. Bring your devices in to see us when you notice:
- Muffled or quieter sound that does not improve after replacing the wax guard
- Feedback or whistling that persists even when the device fits properly
- Distortion or crackling during regular listening situations
- A device that cuts in and out intermittently
- Visible debris inside the shell that the wax pick cannot dislodge
- Any change in how the device sounds after exposure to heavy sweat or rain
We use specialized vacuum tools and ultrasonic cleaning equipment that remove deep-set wax from vents, microphone screens, and receiver housings without risk of damage. Many of these issues resolve in minutes in our office but would require a full manufacturer repair if left unaddressed.
Plan on professional hearing aid maintenance every three months. Patients who spend time outdoors, exercise regularly, or produce more earwax than average benefit from coming in every six to eight weeks. Our hearing aid repair and maintenance page covers what to expect at each visit.
How Maintenance Connects to Your Overall Hearing Health
Hearing aid maintenance is not just about the devices. It connects directly to the quality of your hearing experience and your long-term outcomes.
Devices that perform at their best deliver the sound quality your brain needs to process speech clearly. When wax buildup degrades that signal, your brain works harder to fill in gaps. Over time, that extra effort adds up to listening fatigue, frustration, and less benefit from your hearing aids.
Consistent maintenance also keeps you more engaged with your hearing care provider. Patients who notice changes in performance and act on them quickly tend to have better-fitted, better-performing devices across the life of the product. Regular professional check-ins pair naturally with hearing tests and evaluations to make sure your hearing aids continue to match your current hearing needs.
If you are still exploring which style suits your lifestyle, our guide to types of hearing aids and the ultimate guide to hearing aids in Sioux Falls both give thorough overviews of what is available. Good hearing aid maintenance habits start at the fitting appointment, and choosing the right style for your life makes the routine easier to stick with.
Patients who stay consistent with maintenance tend to be the same patients who schedule timely follow-ups, catch problems early, and get the most value from their devices long term. Our proactive hearing care guide covers how that broader mindset pays off.
Expert Hearing Aid Maintenance Support in Sioux Falls
We have helped Sioux Falls and surrounding South Dakota communities get the most from their hearing aids for more than 20 years. Proper maintenance is part of the care we provide at every step, from your first fitting through every follow-up adjustment.
When you choose Stanford Hearing, you get ongoing support, not just a device. Our team performs professional cleanings, real-ear adjustments, and full device inspections to keep your hearing aids working exactly as they should.
Here is what we offer every patient:
- Free initial consultation and comprehensive hearing evaluation
- 10-day trial period to test your hearing aids in real life before committing
- Five premium brands: Phonak, Starkey, ReSound, Unitron, and Oticon
- Price match guarantee and no-interest financing
- In-network with major insurance plans, including Medicare Advantage
- Ongoing professional hearing aid maintenance support at both our Sioux Falls and Buffalo locations
Your hearing aids represent a meaningful investment in your quality of life. Protect that investment with the right care. Contact us to schedule a free consultation or professional cleaning appointment.
Your Hearing Aid Maintenance Questions Answered
How often should I perform hearing aid maintenance at home?
Wipe them down and brush the ports every evening. Replace wax guards monthly, or sooner if sound becomes muffled. Bring them in for professional maintenance every three months, or more often if you are active outdoors or produce significant earwax.
Can I use alcohol wipes to clean my hearing aids?
No. Alcohol degrades protective coatings, weakens seals, and can damage plastic shells over time. Use a dry cloth or the dry cleaning tools included with your device. If you need to disinfect the surface, ask your hearing care provider which products are approved for your specific model.
My hearing aid sounds muffled. Will cleaning fix it?
Often, yes. Muffled sound is the most common sign of wax blocking the sound port or a clogged wax guard. Start by replacing the wax guard. If sound does not improve, use the wax pick carefully on the sound port opening. Persistent muffling after those steps warrants a professional inspection before assuming the issue is electronic.
How do I know when to replace the wax guard?
Replace it on a monthly schedule regardless of how it looks. If sound becomes muffled or noticeably quieter before the month is up, replace it early. Some patients who produce more earwax need replacements every two weeks. Your hearing care provider can recommend the right schedule based on your wax production and device style.
Is nightly dehumidifier use really necessary?
Yes, and we recommend it as a non-negotiable part of your routine. Nightly use removes accumulated moisture before it can corrode internal components. Electronic dehumidifiers with UV sanitizing also reduce bacteria on the device surface. Do not place rechargeable hearing aids in a desiccant-style dehumidifier unless it is specifically designed for rechargeable devices.
What happens if water gets inside my hearing aids?
Remove them immediately and pat dry with a soft cloth. Do not use a hair dryer or place them near a heat source. Open any battery doors if your devices use disposable batteries. Place them in an electronic dehumidifier overnight. If sound quality does not return to normal within 24 hours, bring them in for a professional inspection as soon as possible.
How is professional maintenance different from at-home care?
Professional hearing aid maintenance uses specialized vacuum equipment and tools that reach into vents, microphone screens, and receiver housings in ways a cleaning brush cannot. We also inspect tubing, dome fits, wax guard seating, and electronic function during each visit. Think of it as the difference between wiping down a car at home and a full service detail. Both matter, and neither replaces the other.